Showing posts with label review. Show all posts

Monday, 21 March 2016

Hobbycraft Make & Bake Clay Review


I was given a packet of Hobbycraft Make and Bake Clay in a very beautiful bright pink colour. I am very much a Fimo girl but I thought that I would give it a try and see how it went. This is just a quick review of my own experience with it and my own opinions only. As I have already said the colour is absolutely gorgeous!

The packaging was a nightmare to get off, I rarely use more than a little bit of clay at one time and always rewrap in the original packaging before storing in bags, there was no way to open this plastic without ripping it unfortunately.
I ripped off a chunk and it was very crumbly considering how soft the clay was. It had a very playdoughy texture rather than polymer clay.
It has an oily feeling to it but this made it very easily mouldable and it needed very little conditioning to get it into a small ball.
It worked really great with cutters, they came out very clean cut around the edges. However it was more difficult to sculpt anything with my hands, it was very soft and picked up every little print.
I managed to combine the hearts into one and the clay blends really well, possibly because of the oily texture too. It is more shiny than matte and feels sticky to the touch even when left for a little while.
Putting a head pin into the unbaked clay was difficult, it went through the clay easily, maybe a little too easy though because it distorted the bottom of the heart where it was pushed in and I had to resculpt the shape a little.
I baked as per the instructions and this little heart charm is the end result. Once baked the clay still has a shine without having any varnish on it at all. It seems very hard and would be hard wearing too. I am impressed with the final result.

I don't think that I would be happy to use this full time for my orders because it is too soft to be able to sculpt any significant details into and I was not fond of the slippery, oily texture of the unbaked clay. However for little charms like this I think that it is a great price per packet and I would definitely buy it for my children to save my Fimo clay for my work. It comes out in a beautiful finish which is essentially the most important thing. I am now hoping that I can store it in my poly bags without it affecting the clay since the original packaging had to be binned.

I hope that this has been informative. If you would like to buy some Hobbycraft Make and Bake Clay follow this link ... Hobbycraft xxx


Saturday, 13 February 2016

Dartmoor Zoo Review

My children broke up for school on Thursday and we decided to go for a family day out at Dartmoor Zoo which is only a short way from our home.

It was raining and drizzling but we don't let the weather get us down, we put on wellies, hats and gloves. Warm and cosy we drove to the zoo which is very well sign posted from the A38. We found it easily and parked in the car park which was almost empty. 

We walked up the hill from the pay station to the main part of the zoo which was a bit steep, however there are beautiful capybara animals for the children to see on the way up so it wasn't too bad. 
Harrison thought they were giant hamsters. 

The main part of the zoo starts with absolutely adorable meerkats. They were running all over the place and having a great time. 
The zoo is really well laid out and just big enough for little people to walk round, we stayed for four hours. We took a picnic with us for the children and ate in the restaurant. The adults had a pasty meal deal for £5.00 which included a pasty, a drink and a snack. I am vegetarian and can honestly say that the vegetarian pasty was gorgeous. It was a lot more affordable than we had expected. It was clean and the service was fast. The attached gift shop is small and good value. They have some lovely items and it is not too overwhelming for little ones that want to spend some pocket money.

We saw lots of amazing animals who didn't seem to mind the drizzling rain either. We saw the wolves, cheetah, lions and a jaguar who was spectacular. They all looked very content and healthy which was a blessing to see. The animals had a lot of space and different aspects of the habitat to entertain them. They were a good distance from the public so that hopefully they didn't feel overwhelmed. 

The most amazing thing for us though was seeing the bears, we thought that they would have been asleep given the cold weather but both Hayley and Fudge were awaiting their handlers who were about to feed them. They were so majestic and I really could of stayed all day just watching them. 
There were so many other animals that we got to see too, all of them seemed happy and very well cared for. There is a lot of construction happening at the zoo at the moment so some of the enclosures were closed but that didn't take away from our enjoyment of the day. 

My Son particularly liked the otters and the red foxes.

I can honestly say that we had a brilliant day, it was very much worth the admission price. They could perhaps have had a children's outdoor play area or even an indoor softplay to make it more of a whole day out than just a morning but we certainly had no complaints at all. 

I would highly recommend a visit if you are local or visiting the area. It is a great size and not as exhausting as some of the bigger zoos that we have visited. Don't let the rain put you off, the zoo is quieter and you can still see the animals. 


Thank you Dartmoor Zoo for a really lovely day out, we look forward to visiting you again soon. Love the Webb Family xxx

Friday, 13 March 2015

Raffy Munny Doll (sort of review)

Lovely bright boxes, bigger than we expected too.
A few years ago I bought a DIY Vinylmation from Disneyland and have not had the courage to actually decorate it. Whilst browsing for similar products I came across Munny Dolls by a company called Kidrobot. I managed to get two Raffys on Ebay for a very reasonable price, cheap enough that I wouldn't be too heartbroken if I didn't like the outcome (unlike my Vinylmation).

Lilly Webbling (aged 6) and I decided to have a girly night, we listened to a bit of Zac Brown Band and decorated our Raffys.

They come in a lovely colourful box and the giraffe is very strong and durable. It will handle a lot of playtime. Inside the box you get your Raffy, which were much larger than I had expected and great for little hands to decorate. You also get a sticker with an outline so that you can design your Raffy before you put anything on the actual vinyl. A Hello My Name Is card with a holographic sticker showing its authenticity AND .... a blind bag with one mystery accessory.

The other contents of the box.

Lilly and I both got the same accessory, I am not sure if this is just the standard one for all Raffys or if we were just unlucky/lucky, we do love the ties that we got.

We decided to use our ties as testers ...


We got ties in our blind bags, great for practicing.

I used Inktense Blocks by Derwent for mine and Lilly used Sharpie markers because they were easier for her to handle.

Both mediums were easy to apply, I used a paintbrush and water for the Inktense.

The Sharpie pens stay a little tacky for a while after drawing your design so you can get a few finger prints in unwanted areas but it does go on in very vibrant colours. The Inktense was much softer almost like watercolours and did smudge a little even after around an hour of drying. However the next morning neither was tacky or smudging.


Has anyone seen my body?

 You can take the heads off to make it a little easier to decorate them separately, I found this particularly helpful when I was trying to paint the face onto the Raffy, it was just easier to get it at the angle I needed. This is also the only way to get the tie on :).


Do you think our ties look smart?

 Lilly designed her Raffy completely independently and I absolutely love her eyelashes! We did find with both the Sharpie and the Inktense that once the colour is on there, you cannot remove it completely! So be sure that you really do want that colour before you apply.


We have pretty backsides too.

We decorated all over our Raffys, just playing and having fun. I love how free Lilly was with her colours, children are not inhibited and it really shows in her Raffy how much she loves bold bright colour and just how much fun she had.


Rosie is cheeky.

This is a close up of Lilly's Raffy, she is now named Rosie.


Chhestring is shy.


And this is my Raffy who has been named Cheesestring (thanks to the suggestion of Harrison aged 3)


In my opinion for the money, these are fantastic creative toys. You don't need expensive materials to decorate them, you could use acrylic paints or any marker pens.They took us around two hours from start to finish then around twelve hours drying time just to be sure the inks had set. It was such a fun canvas to work on and I believe it would be quite difficult to end up with a Raffy that wasn't adorable.

They have been handled and played with by both of the Webblings who adore them. I would like to try one with a unicorn horn one day and perhaps one with wings but the possibilities are endless. I can see them being played with for a long time to come. xxx


Monday, 26 January 2015

Coolmorph Trial and Review


 I was very lucky to be sent a trial pack of Coolmorph a thermoplastic polymer with a low melting point. It has taken me a while to try it but my daughter keeps trying to pinch my beautiful pair of Otter Strange horns which are made of glass, I would be devastated if she were to break them. So I thought I would try and make her some plastic ones. However she decided that she would rather have a unicorn horn. This is how my first try went ... I hope you find it helpful.  

Pellets in warm tap water
I read the instructions which state that the pellets will melt in hot tap water. As you can see they did join together but were in no way moldable. I thought perhaps I had left them sitting around unused for too long and now they were bad but I was wrong. 
Definitely not moldable


I boiled the kettle and added the boiling water to the bowl, they melted instantly and compacted together. Be careful though the water is boiling so be sure to scoop it out with a spoon. Once it is out of the water the plastic isn't too hot to handle and feels very rubbery.


Ready to mold


It is quite tricky to sculpt with the melted pellets, they like to stretch in odd places and not stay in the shape that you would like them to but with a little practise I managed to get a horn shape and holes for the elastic either side. You have a few minutes where the coolmorph is very soft and squishy but as it cools it does get harder to shape. If you are not happy with it you can simply pop it back in the hot water and it will get softer again.

It also sticks to nail varnish so I wouldn't recommend using it if you are worried about ruining your nails! I think it would also stick to rubber gloves too. 

Once you are happy with your shape you can put it into a bowl of very cold water and the plastic sets very hard!


Setting in cold water


To make the holes for the ribbon I tried to use the end of a wooden paint brush but the Coolmorph just stuck to it and became tacky. I then tried a metal ball tool from my clay and that worked perfectly although it is fiddly to make holes. If you were making a bigger figure it might be better to make smaller bits and add them onto the sides rather than making them in one piece the way that I did. My daughter did like the white, which is the colour that the Coolmorph will naturally set at if you do not colour it but she decided that she would like it blue and yellow.

It took around two minutes to go completely hard.


Set into a horn


Even after you have set it in cold water you can simply pop it back into the hot water and remelt it to start all over again. With the kettle reboiled the coolmorph once again melted instantly.


Re-melting

You can purchase colour packs for the Coolmorph which go with the pellets, however I did not want to buy them until I was sure that I would use the product again. I decided to use poster paints, they are very messy so be prepared for them to go everywhere! I simply added a little dry powder to the melted plastic and folded in.


folding in poster paint
The poster paints make the plastic hard to handle, it does not like to stick to itself the way that the uncoloured plastic did, it seemed as though the powder dried out the plastic but it is still very usable and you can always pop it back into the water to melt it a little again however you will lose a little of the colour in the water. It also got some air bubbles in from folding in the colours but you can squeeze the plastic to get them out before it sets.


Finished Unicorn horn
 Be aware that any of the plastic that does not have colour in it will set white! I missed a few spots in my eagerness to get the right shape but I think that this adds a nice effect and you can see the swirls inside the plastic more than you would with solid colour so it really depends on your preference.


second try
 My son decided that he would like one too so he chose his colours, green and gold. I made it in exactly the same way but with a little more plastic pellets so that it would be thicker.


finished items
As you can see I only used around 1/3 of the trial pack that they sent (25g in the trial pack I believe) so it really does go a long way. 

Once they are set they are very strong. I tried dropping them on the floor and bashing them on the side of the table and they didn't break or scratch, they have a little bend to them which is perfect for the kids because they won't be able to break them. However because they are hard they will only be able to wear them when supervised, I would hate them to get in someones eye it would be sore!

I had a lot of fun experimenting with Coolmorph. I can see it will be great for the kids cosplay and for horns, claws etc for my other creations. As I work mainly in small items I can see this pack lasting a little while longer but would be more than happy to pay the price that they are asking for more.

I would like to try it with the children and see what they come out with because it is a relatively clean and tidy craft that they would enjoy and the only real risk is in the hot water but that is easy enough to do for them.  It is a lot like Plasticine or even polymer clay only the final creation is a lot less breakable.

I will definitely be using this product again and would recommend it if you have a clear idea of what you would like to make, because of the limited time that you have to mold your creation. You do not have long to work on it if you wanted a highly detailed end product and every time you melt it back down you are essentially starting from scratch.

It is certainly a lot of fun especially as there is no wastage, if you don't like what you have made just start again! I think with some practice I could make some interesting creations.

I hope that if you decide to give it a go you have fun! Please share your experiences in the comments if you do. xxx


This is my smallest Webbling wearing his Unicorn horn which he really loves and below is my big Webbling who wants to wear her horn everyday from now on. A big success I think!


Samantha xxx

Sunday, 19 May 2013

Sculpey Bake 'n' Bend Clay Review


I finally got around to playing with the bake and bend. I decided to make a little frog, please excuse the photograph it isn't great but you get the idea.
This is the first time I had attempted to use it, it feels like ready conditioned clay and is really smooth but oily to sculpt. The colours blend nicely which is great because the pack only has basic colours included. It sculpts very easily but takes a lot of work to smoothen joints and attach more pieces, such as the legs on this frog.
It was very difficult to add any fine details to the clay because it is so soft. Perhaps blanching (correct term?) to reduce the oil might help but I was eager to play with it.
I used the specified time and temperature but it still burnt on the thinner bits, I expect some of you would be able to avoid this but I never usually have this problem with fimo but that does bake at a lower temperature anyway. A paint job should be able to save him.
Fully baked and cooled, I tried to bend it. In my opinion bendable is not exactly the right word to describe it. It is a little more flexible than regular clay and good for pieces like the tongue which would be less likely to break off but it doesn't really 'bend' as such. I fear that even the tongue would snap off if you tried to really bend it and not just wiggle it! The feet have little to no flexibility, same for the eyes.
So for a first attempt, I would say I learnt to bake at a lower temperature and not to expect too much flexibility. I think it would be best suited for bangles or rings that need just a little flexibility to wear.
Would love to know if anyone has better success or could give me any tips. Love Sam x


Thursday, 16 May 2013

Fimo Moulds Review


This is a review based on my first experience of using Fimo moulds. It is purely my opinion.

I have never used moulds to create anything with clay previously but as I was sent them so generously by Staedtler to use in my clay session in June and I thought that I had better try it out before I take them along, I was so surprised by how beautiful they are and how easy they are to use!

I used the air dry clay, I sprinkled one with powdered chalk and the other with mica pigment then pressed the clay into the mould. The fact that they are transparent helps you to check you have no air bubbles and they are really bendable so you lose no detail when you push the shapes outwards.

I find the shapes beautiful though a little flat in comparison to my usual dimensional creations because the bottoms are completely flat. However my 5 year old daughter pointed out that they would be lovely as fridge magnets so we will be adding small magnets to the back of my examples.

They are so simple that anyone can create beautiful pieces of art work. They can be used for Fimo soft, to make candles, chocolate, crayons, soaps etc too, they are so versatile. If you are working with children or with adults who need to build a little confidence with clay before starting a more independent project then these moulds are fantastic! I intend to use them during the session and combine them with Fimo Air Light to create more magnets.

Unexpectedly these are highly recommended! xxx

Fimo Air Natural Review


This is a review of my own first experience using Fimo air natural clay and is solely my opinion.

When I opened this clay I was a little intimidated, it is nothing at all like polymer clay which is my clay of choice. It is like a paper pulp to handle and is rather wet. It has an off white colour to it and looks like a really natural product. It gets dry quite quickly and is very messy but a lot of fun! You need to use a lot of water with this clay to sculpt it into the shapes that you require but only small drops at a time or you will be left with an usable clump of mulch.

It surprised me by being really mouldable, it took on the shapes easily and really responded to the small amount of water that I used to smooth edges and join the components together. It also kept the ridges that I created for the toadstools really well as it dried too! I did not colour it before sculpting because of how wet it felt but it can be painted afterwards which I fully intend to do with acrylic paints.

It is brilliant for children because it has no scent whilst moulding or setting it. However it does take 24 hours to completely set so you would need extremely patient children and more than one crafting session to complete a piece.

I am really looking forward to trying more with this clay, it has a really great texture that feels very natural and is very inspiring. I think it would be great for any creation based around nature, trees, toadstools etc and I hope to explore some of these options despite the messiness which to be fair only makes it more fun! I am not sure that I would be able to do anything with huge sculpted detail but I would really like to try.

This is definitely a clay to try if you like to get messy and really feel the clay between your fingers. Children will love it too. xxx

Fimo Air Light - Microwaveable Review

This review is based on my experience, the first time that I got to experiment with Fimo Air Light, microwaveable clay, it is my own opinion and nothing more.

This version is almost exactly like the air dry Fimo Air Light (please see the previous blog post for a review on the air dry clay) except that as the name suggests, you can set it in a microwave. You simply make your product, pop it into your microwave next to a small bowl of water and zap at 600w for 10mins.

The clay has no scent even whilst cooking which makes it great for using with children and you do not need to have a separate microwave either. The white version is brilliant white, I added mica pigment for the creations in the image above, the gold looks great but the silver made the clay look a bit dirty. The clay is hard to keep clean and you cannot use a wet wipe as you would with polymer clay because the moisture smooths the details that you have purposely added.

I found that the texture was brilliant for making marshmallow charms though! This is another product that works better with the moulds than sculpting figures although I did create a small bird figure which has a very simple shape. Once dry the beak of the bird is extremely sharp and surprisingly hard. It can be painted and varnished once the clay has been set too.

I would highly recommend the microwave version rather than the air dry version if you are intending to use the product with children because the fact that it is so fast to set is amazing, it really helps if they want to add colours afterwards. I do not think that I would use this clay to make anything with a lot of detail but I will definitely be using it with my own children as an introduction to clay.

Fimo Air Light Review


I have only used Fimo air light once and this review is my opinion and other people may have had very different experiences with this product.

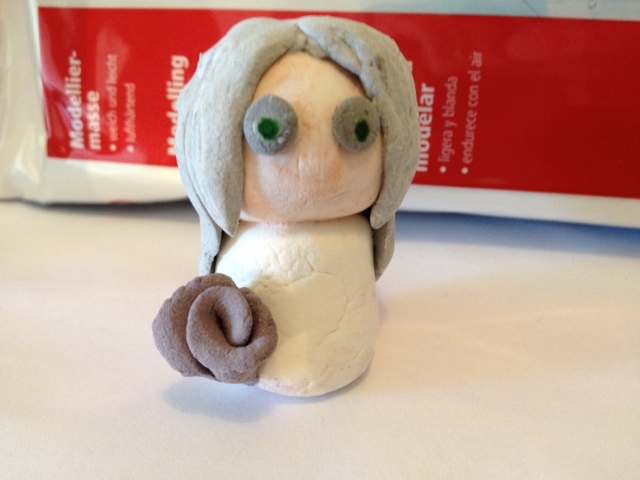
The large packet that I have is white and it is pure brilliant white, you cannot fault the colour. I used chalk pastels in small quantities to add colour to the white clay and it seems to add a really lovely effect to the clay. As the name would suggest it is an extremely light clay and is entirely differnt to the Fimo soft which I am used to creating with. It is also stickier and the consistency is more like a melted marshmallow than clay, you do not need to condition the clay at all which makes it ideal for using with small children who often find even Fimo soft a bit tricky to condition. A definite bonus is that it does not smell at all, no fumes as it bakes either because it is air dry.

It was difficult to compress the clay without creating folds and cracks, you can use water to smooth them over but as you can see from the chibi on the right, cracks and folds seem to come back as the figure dries. I found it extremely difficult to create small details without creating more creases in the clay and adding water to remove the creases then removes the details that I am trying to create.

The moulds (made by Staedtler also) are perfect for this clay, I used a dry brush to spread powdered chalk to the moulds before adding the clay and afterwards used water to spread the chalk around the shape.

The clay takes 24 hours to completely air dry, once it is dry you can paint it and create more effects but it does feel a lot like plaster and powdery, it can be sanded down if necessary and can be varnished but the examples that I have shown have not had any afterwork to them other than small dots with a sharpie marker on the chibi. After the drying time, unelievably it is even lighter, I can imagine that it would be perfect used for mobiles and large statement pendants.

In conclusion, this clay is perfect for larger pieces that require bold details but in my opinion is that Fimo air Light is not suitable for small detailed pieces. It is perfect when combined with the Fimo moulds and could be of benefit in creations where weight is a problem. However the colours that can be achived are lovely and it is well worth playing with if only for the fun of the marshmallow like squishyness xxx