My lovely Mother-in-law gave me a Tjanting set for my birthday, she was unaware that you needed extra dyes, but no fear I decided to try "Fake Batik" (I'm not sure if that is actually a thing but I did not use the traditional methods to dye the fabrics)
I decided to try decorating some plain white t-shirts that I had bought for my son to wear this summer and he had refused to wear because they were boring!
I drew out designs onto the backs of cereal boxes in black so that I would be able to see them through the fabric.
I didn't want the melted wax to go onto the back of the t-shirt so the card acted as a barrier between the layers. Even if you want to free hand a design onto a t-shirt you will need to place something between the layers or parts of the design will go through to the back.
I filled the tjanting cup halfway with tiny wax pellets that were supplied with the kit (my kit is by Crelando if you wanted to get the same, please follow the instructions from your own set) and heated the wax until it was completely liquid. I placed a scrap of fabric under the spout in case any leaked out but the stand is designed so that the cup is tilted backwards and the wax does not go near the spout unless you tip it forward so always use the stand! I also used this scrap to try drawing a few little dots before I tested it on the t-shirt, i wanted to be sure that the wax would soak into the fabric without ruining it.
The t-shirt fabric was ideal to put the wax onto, it is a tricky process and you have to work quite quickly to get the lines neat. when you hesitate you get blobs that bleed further on the fabric. It is like drawing with a very long pen and does take a lot of getting used to. You could perhaps practice drawing with water to get the hang of the tjanting tool first?
I managed to draw my design on and quickly learnt that bold lines are great but small details end in big smudges. Also be careful that you are not touching the bottom of the tjanting tool onto the wax that you have already applied, I made this mistake and it smudged the bit I had already done AND possibly more annoyingly, the wax gathered on the underneath of the tjanting cup and then dripped onto the t-shirt (the annoying blobs to the right of the dinosaur).
Once the wax was completely dry (it only takes a few minutes) i turned the cereal box card over and put it back in because I was concerned that whilst using water and inks the pen I had used to draw my designs originally would seep through onto the front of the tshirt.
I used Inktense blocks and a paintbrush and tried to get a sort of smudged camouflage effect. You have to make sure that you completely surround your wax drawing with ink. Anywhere that has wax on should stay clear when the wax is removed.
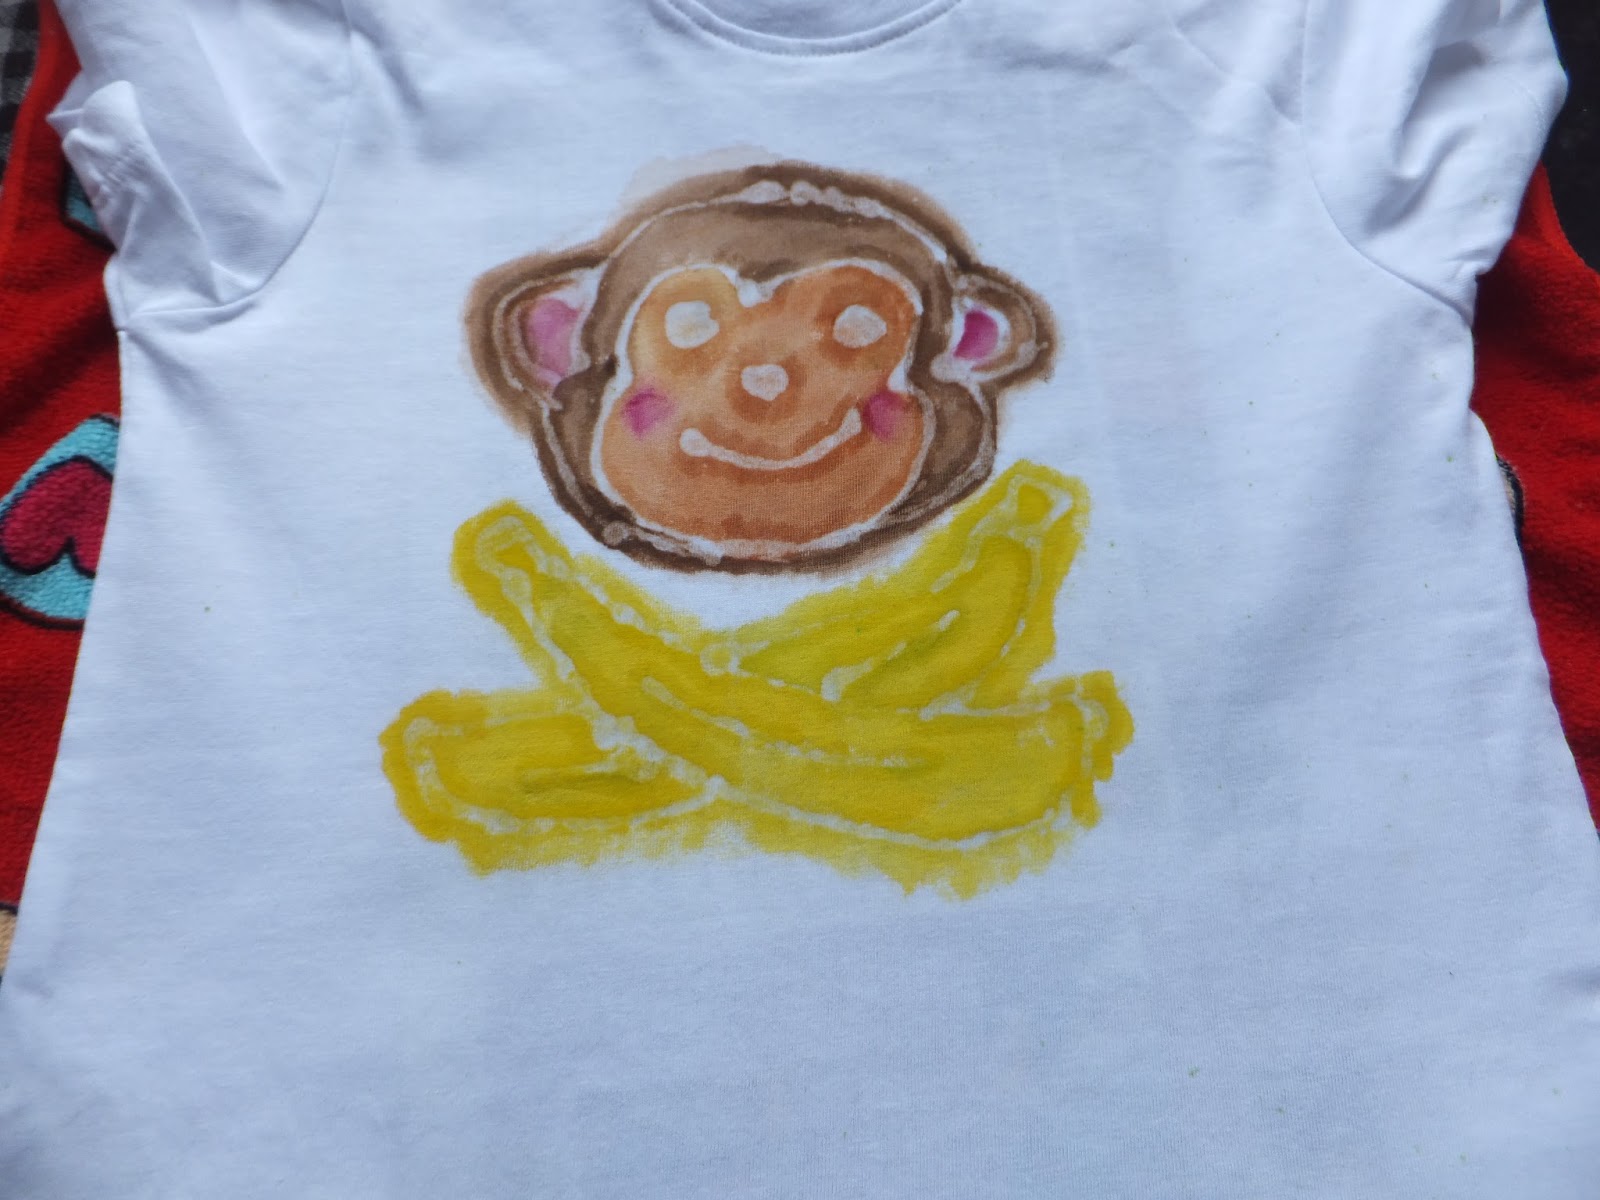
I decided to be a bit more controlled with the monkey but still wanted it to have that unique Batik feel to it so I didn't want to be too perfect with it.
I left the ink to dry completely overnight before attempting to remove the wax. This was the part that I was most nervous about. I used an iron and some newspaper to soak up the wax. I placed it all onto a tea towel so that I didn't ruin the worktop. I folded up a piece of newspaper and placed it inside the t-shirt, between the layers to make sure that I didn't have wax marks left on the back of the t-shirt.
I placed the newspaper on top and ironed it with a normal household iron on hot with NO STEAM that is very important because it could make the newsprint transfer to your t-shirt. This is how the dinosaur came out.
I don't think that I applied enough wax to the dinosaur, I should have gone over the areas where the wax look thin but it was a trial and I still think it came out like a dinosaur hiding. I think I may have soaked it too much in water too because the ink seems to have seeped below the wax. I think in future I would give the fabric a small spritz of water before I start to paint it so that I need less water.
When ironing onto the newspaper you can tell if you have ironed that whole image because you can see the wax outline come through the print. I used around 3 sheets of newspaper for each t-shirt to be sure all of the wax came off of the fabric.
The monkey and cross bananas came out much better than the dinosaur, I think it might have been because I used less water when painting with the inks.
I didn't think that the monkey looked quite right as it was so I added some little pupils to the eyes. You can add more and more ink where you would like it, you can also add another layer of wax and paint again if you would like to layer your design but I liked how it came out once the eyes were finished.
The t-shirts were supposed to be for Harry but Lilly took a shine to the dinosaur one and since she is so tiny it fit her nicely! What do you think? These two are really happy with them. I had a lot of fun creating them and definitely think that I will be doodling more designs to try in the future.
They wasted no time in playing roaring dinosaur and cheeky monkey! They do make me laugh and have given me requests for their next t-shirts already. If you decide to try this technique I would love you to share it in the comments section so that I can see it. Good Luck xxx